
 This website is here to provide you with the
necessities to


 ✿ Owner: Kayla
preppy text v19
What you'll need:♥ this scanline pattern
♥ this circle pattern
♥ this grunge pattern
You'll be making something like:
with grunge:

without grunge:

The Steps
1. Type out your text. Color it in like this (click here) tutorial.
2. Duplicate the layer 3 times. You should now have 4 text layers. On the 2nd layer, use the move tool to move it to the right 1-2 times and down twice. Add a color overlay.

Add glitter by clicking "Filter >> Noise >> Add Noise" >> rasterize it! >> match your settings to mine.

I have this now

3. On the 3rd layer, add a color overlay like you did in step 2. Now move it to right 3-4 times and down 3-4 times.

4. On the 4th layer, add a NORMAL color overlay with the color #333333. Use the move tool to move it to the right 5-8 times and down 5-8 times. I have this now.

5. On the 1st layer, Add a Bevel and Emboss, Inner Shadow, Inner Glow, and a Pattern Overlay. Match your settings to mine:
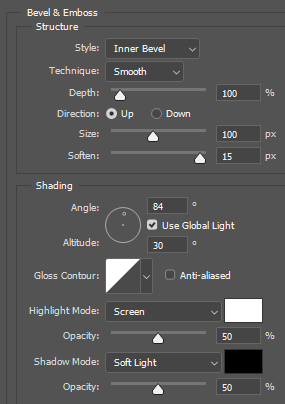
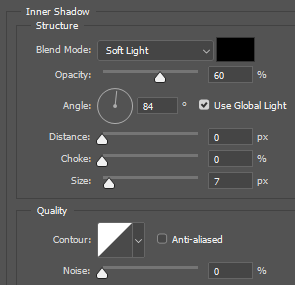

Use the circle pattern. Slightly adjust the opacity if you need to.

6. Here's what my layers look like:

Create 4 new layers. Merge one with EACH of the text layers. Now my layers look like this:
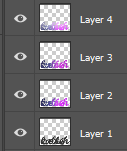
7. Now merge your 4 text layers together and you should have one now. Add a stroke.
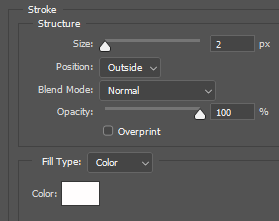
I have this now

8. Create a new layer. Merge it with your text layer. Now add a stroke with the scanline pattern

Add a drop shadow:
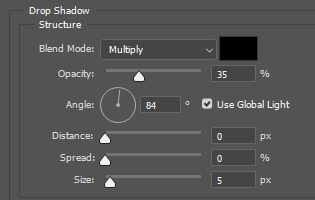
I have this now
OPTIONAL: Use the grunge pattern
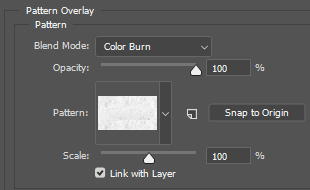
Finished Product with grunge:
without grunge: